Troubleshooting
A - Prerequisite:
Run agilab.sh to install and then try to run your xxx-project. Each AGILab API call should be set with verbose mode >= 3. In particular, when debugging with a Dask worker, it will create a file (~/xxx-project_trace.txt) that shows what happened in during the worker build execution.
B - Run/Debug configurations (PyCharm and shell):
You can run the same flows either from PyCharm or from the CLI wrappers in
tools/run_configs. Non-PyCharm users should launch the .sh wrappers
directly from a shell.
If PyCharm reports a mixed AGILAB checkout, or an import such as
ModuleNotFoundError: No module named 'agi_gui' after you opened another
source tree, rebind the JetBrains SDK from the checkout you want to run.
macOS/Linux:
CHECKOUT="${AGILAB_CHECKOUT:-/path/to/checkout}"
cd "$CHECKOUT"
uv sync
AGILAB_PYCHARM_ALLOW_SDK_REBIND=1 uv --preview-features extra-build-dependencies run python pycharm/setup_pycharm.py
Windows PowerShell:
$checkout = $env:AGILAB_CHECKOUT
if (-not $checkout) { $checkout = "C:\path\to\checkout" }
Set-Location -LiteralPath $checkout
uv sync
$env:AGILAB_PYCHARM_ALLOW_SDK_REBIND = "1"
uv --preview-features extra-build-dependencies run python pycharm/setup_pycharm.py
This switches the global uv (agilab) SDK to that checkout. Rerun full
install.sh only when you also need installer side effects such as app
installation, .agilab-path updates, dataset seeding, or installer test
suites.
runConfigurations/
install_agilab_enduser.xml
C - Exemple of Tests Sequence:
** zip-all gen**
Generate a zip archive of the whole AGILab project directory using .gitignore-style filtering. The command writes
agi.zipat the project root.** test-agi-env test**
Run the unit tests for
agi_envand display their pytest output.** core test**
Run all unit tests for
agi_coreand display their pytest output.** app_script gen**
This will generate the script below
** <your app>-preinstall**
This will test the conversion of <your_code>_worker.py into <your_code>_worker.pyx to check if your code is transformable into Cython compilable source code. A file <your_code_worker.pyx> should appear in your wenv
** <your app>-postinstall test**
This will test the test your worker post_install.py.
** app-manager install**
This will install the venv in your fwk/apps/<your app>.
** app install**
This will install the venv in your apps/<your app> and in your <home>/wenv/<your worker>.
** <your app>_egg gen **
Generate your project egg file containing all the required files to compile the worker Cython library.
** <your app>_lib gen **
Generate your project lib file by compiling <your_code>_worker.pyx and add its dependencies into a Cython library.
** <your app> test**
This will test your app in a minimalistic way.
** <your app> run**
In the contexte of apps/<your app>/.venv it will run the log/AGI.<snippet> you have selected which should only be a distribute or a run one. Remark: use script “app install” to test your app install as it has to be run under fwk/core/.venv virtual environnement.
D - agilab_run_dev vs agilab_run_enduser vs lab_run:
1. agilab_run_dev and agilab_run_enduser
Main script to lunch agilab in mode dev or in mode enduser This will run the web interface module in run/debug mode
12. lab_run_test
Only for enabling lab_run.py debugging This will directly lunch run_lab.py in run/debug mode
E - macOS NFS server checklist:
Use this quick list when you need a shared dataset folder between Macs (for example, a cluster
controller exporting /Users/<user>/data to another workstation). Replace <nfs_server_ip> with
your server IP and adjust mount paths as needed. The default AGI_CLUSTER_SHARE is
clustershare/<user> under $HOME. For cluster-enabled apps, that path must be mounted
and writable on every node: AgiEnv now fails fast instead of silently falling back
to AGI_LOCAL_SHARE or $HOME/localshare. Ensure the chosen path exists and is writable.
In remote-worker mode, keep AGI_CLUSTER_SHARE as the scheduler-side share root and
use Workers Data Path for the worker-visible SSHFS mount target; AGILAB preserves an
existing scheduler share when those paths intentionally differ.
If you override the default in a multi-user setup, keep one exported share root per user
instead of pointing several operators at the same writable cluster-share directory.
The example export below uses a nobody:nogroup ownership policy so every
worker sees identical UID/GID mapping; keep that in mind if you point exports
somewhere else.
1. Exports and daemon health (server)
cat /etc/exports
# Expect to see the export, e.g.:
# /Users/<user>/data  -alldirs -mapall=-2:-2  127.0.0.1 <client_subnet_cidr>

sudo nfsd restart

showmount -e <nfs_server_ip>
# Expect: /Users/<user>/data ... <client_subnet_cidr> (or your client IP)

rpcinfo -p <nfs_server_ip>
# Expect to see nfs on 2049/tcp and mountd on tcp (typically port ~850)
2. Directory permissions (server)
ls -ldn /Users/<user>/data
# If you rely on -mapall=-2:-2, make the directory writable by nobody:nobody:
sudo chown -R nobody:nobody /Users/<user>/data
# or grant an ACL if you cannot change ownership:
sudo chmod +a 'everyone allow read,write,delete,add_file,add_subdirectory,file_inherit,directory_inherit' /Users/<user>/data
3. Can the client see the export?
Run this from the second Mac:
showmount -e <nfs_server_ip>
# Expect the same export list you saw on the server
4. Mount and verify (client)
sudo mkdir -p "$HOME/clustershare"
sudo mount -t nfs -o vers=3,tcp,resvport <nfs_server_ip>:/Users/<user>/data "$HOME/clustershare"
mkdir -p "$HOME/clustershare/$USER"

mount | grep clustershare
# Expect one line, e.g.:
# <nfs_server_ip>:/Users/<user>/data on /Users/<user>/clustershare (nfs, ...)

ls -la "$HOME/clustershare"
# Should show the server directory contents
5. Read/write + UID mapping check (client)
echo "hello" | sudo tee "$HOME/clustershare/$USER/.nfs_test" >/dev/null
ls -ln "$HOME/clustershare/$USER/.nfs_test"
# With -mapall=-2:-2 you should see owner/group 4294967294:4294967294
sudo rm "$HOME/clustershare/$USER/.nfs_test"
6. Optional: autofs on the client
grep -n 'auto_nfs' /etc/auto_master
cat /etc/auto_nfs
# Expect a line such as:
# /Users/<user>/clustershare  -fstype=nfs,vers=3,tcp,resvport  <nfs_server_ip>:/Users/<user>/data

sudo automount -vc
ls -la "$HOME/clustershare"      # triggers the automount
mount | grep clustershare           # confirm a single NFS mount
Quick troubleshoot
Export missing on the client
showmount: fix/etc/exportson the server (allow the client IP or subnet), thensudo nfsd restart.Timeouts: from the client run
rpcinfo -p <nfs_server_ip>. If it hangs, temporarily disable the server firewall:sudo /usr/libexec/ApplicationFirewall/socketfilterfw --setglobalstate off # test, then restore: sudo /usr/libexec/ApplicationFirewall/socketfilterfw --setglobalstate on
Permission denied/ read-only: ensure the exported directory is writable by the mapped identity (nobodyor another service user).Stale SSHFS mount after a worker crash or scheduler switch: unmount the worker target, then rerun
agilab doctor --cluster --setup-share sshfs --apply. AGILAB attempts cleanup automatically when it detects a stale, unexpected, or unwritable SSHFS mount, but manual cleanup is useful when changing scheduler hosts:REMOTE_SHARE="$HOME/clustershare/agilab-two-node" fusermount3 -u "$REMOTE_SHARE" 2>/dev/null || fusermount -u "$REMOTE_SHARE" 2>/dev/null || umount "$REMOTE_SHARE" 2>/dev/null || true
Double mounts in
mountoutput: unmount twice to clear stacked NFS layers, then remount or let autofs handle it:sudo umount "$HOME/clustershare" || true sudo umount "$HOME/clustershare" || true
Known Limitations And Deprecations
This section is for known limitations, deprecation-sensitive behavior, and workarounds that still matter to operators. Each entry should explain the user impact, the current workaround, and the expected migration or removal target.
<install.sh> does not generate Run/Debug configurations after worker install failure
If a worker install fails before <home>/wenv/<app>_worker/.venv is created,
pycharm/setup_pycharm.py cannot generate the matching run configuration.
Run the PyCharm configuration app install (local) for the affected app path
to debug the installation, fix the app, then run:
uv --preview-features extra-build-dependencies run python pycharm/setup_pycharm.py
Migration target: keep this as a documented recovery path until the installer can emit a single actionable remediation command for failed worker environments.
<install.sh> appears frozen while building heavy dependencies
When you run install.sh it may appear frozen at some point.
Installing agi-cluster...
uv --preview-features extra-build-dependencies sync -p 3.xx.xx --dev
Using CPython 3.xx.xx
Creating virtual environment at: .venv
Resolved xxx packages in xxms
Building agi-cluster @ file:///path/to/checkout/src/agilab/core/agi-cluster
The sync keeps waiting because uv still has to build heavy dependencies
from source. Wheels for packages such as numba/llvmlite are only
pre-built for selected Python versions; unsupported versions can fall back to a
full compile that takes many minutes before any log progress appears.
Migration target: prefer Python versions with published wheels in public installer docs, and keep dependency-policy checks focused on avoiding accidental heavy dependencies in base packages.
<UV> VIRTUAL_ENV Warning
While running uv inside a project from another one:
warning: VIRTUAL_ENV=.venv does not match the project environment path /path/to/checkout/src/agilab/apps/builtin/minimal_app_project/.venv and will be ignored; use –active to target the active environment instead
This is an informational uv warning, but AGILAB-managed PyCharm configs and run
wrappers clear VIRTUAL_ENV before invoking uv so normal launches should not print
it. If it appears, you are probably running uv directly from an activated shell. Use
the matching tools/run_configs wrapper or run unset VIRTUAL_ENV before the direct
command. Do not add --active unless you intentionally want to reuse the currently
activated virtual environment instead of the AGILAB project environment.
Migration target: keep launch wrappers clearing VIRTUAL_ENV; do not migrate
AGILAB launch guidance to uv --active.
<Python> pip resolver warning during ensurepip
While installing an app, you might encounter the following error:
uv --quiet run --project 'your project path' python -m ensurepip --upgrade

ERROR: pip's dependency resolver does not currently take into account all the packages that are installed. This behaviour is the source of the following dependency conflicts.
This is a warning from pip rather than an AGILAB install failure. Re-run the
latest installer if the environment is otherwise incomplete, especially if
No module named pip appears in ~/agi-space/.venv.
Migration target: keep the installer guarantee that pip exists inside the
managed environment, and retire this note once install logs distinguish this
warning from actionable failures.
<UV> Sync Failed
While running a script you see a “missing module” message but your module is correctly installed in your venv. And when you try to reinstall it his can lead to re-installation failures due to circular dependencies that prevent proper package version resolution. This may arrived because your UV cache has been corrupted.
Solution:
Clean the UV cache by executing the following command:
uv cache clean
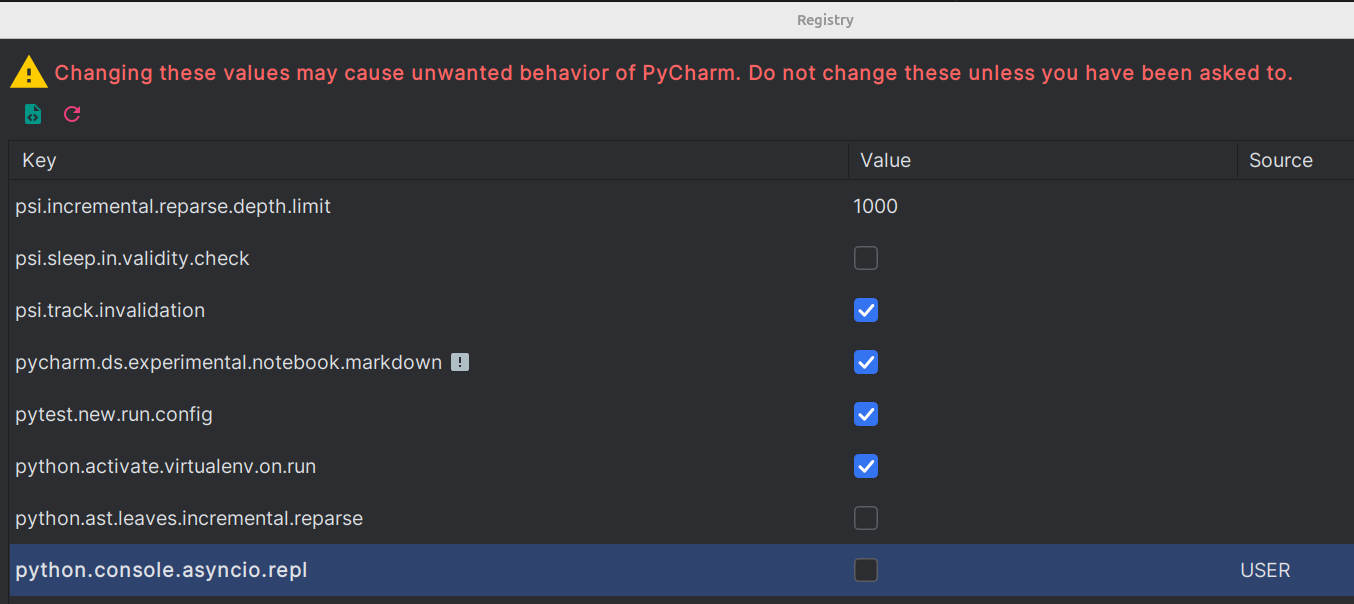
<DASK> Debug Issue
While debugging Dask on Python, you might encounter the following error:
TypeError: _patch_asyncio.<locals>.run() got an unexpected keyword argument 'loop_factory'
Workaround:
Disable python.debug.asyncio.repl in the PyCharm registry. To do this, go to Naviguate/Search Everywhere (<Shift>+<Ctrl|command>+A) to open the <Action> tab then search for registry.
<PYCHARM> Run/Debug Configuration is Broken
For instance, select your “Run/Debug configuration” (e.g., <gen-docstings>) and then press [Run]. The following message appears when you try to [debug] <gen-docstings>:
Argument for @NotNull parameter ‘module’ of com/intellij/openapi/roots/ModuleRootManager.getInstance must not be null
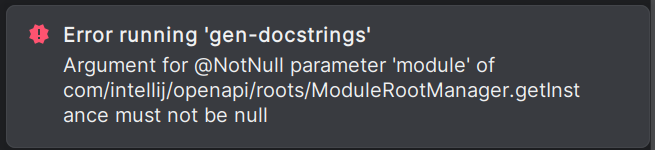
Solution:
This is because your Pycharm script is pointing an a venv but the project containing this venv is not attach to your current project. So you have to attach this project to your currrent project for enabling your script to be runnable again.
<PYCHARM> Can’t open your project
After an install of agilab when you select your project to open but it failed. This might come from pycharm/setup-pycharm.sh that have corrupted your pycharm settings
Solution (macOS):
# remove caches and index rm -rf ~/Library/Caches/JetBrains/PyCharm*
# remove locks / and broken files find ~/Library/ApplicationSupport/JetBrains -maxdepth 2 -type f -name ‘.lock’ -delete rm -f ~/Library/ApplicationSupport/JetBrains/PyCharm/options/recentProjects.xml rm -f ~/Library/ApplicationSupport/JetBrains/PyCharm*/options/other.xml.___jb_tmp___ rm -f ~/Library/ApplicationSupport/JetBrains/PyCharm*/options/jdk.table.xml rm -f ~/Library/ApplicationSupport/JetBrains/PyCharm*/options/jdk.table.xml.___jb_tmp___
Failed to read pydantic metadata
If the installer emits Failed to read metadata from installed package pydantic==2.12.3:
Clear the offending wheel:
uv cache clean pydantic
Reinstall
pydanticin each affected project:cd src\agilab\core\agi-env uv pip install --no-cache-dir --force-reinstall pydantic==2.12.3 cd ..\agi-node uv pip install --no-cache-dir --force-reinstall pydantic==2.12.3 cd ..\agi-cluster uv pip install --no-cache-dir --force-reinstall pydantic==2.12.3
Rerun the installer.
The METADATA files are regenerated and the warning disappears.