Note - this article was originally posted on Hal's blog on March 24, 2023 under the title "CipherTrust Transparent Encryption."
In many organisations, IT departments are sometimes required to delegate some of their responsibilities to other teams, but at the same time, also required to keep control of the company security. Wait! In the world of security, can data security become a delegated responsibility? If that is a yes, then how?
Five years ago, I was pulled into the DevOps team culture and mindset. Since then, I have been lucky enough to manage the building of several DevOps teams. One of the many attributes of the DevOps culture is their autonomy. DevOps teams build in a way that can execute a task from end to end. The teams build up while working through the requirements and functions of the project or product, and with this knowledge, go on to find the most effective way of breaking the silos encountered by traditional teams.
Introduction
The previous paragraph described DevOps as being about speed of delivery and autonomy, which also requires the team to access resources that are not always managed within the team; Active Directory, file shares, and so on are examples of these resources. So, how can you keep your DevOps team focused, but not affect the company processes?
Scenario
Let’s put the DevOps information above into context using a real scenario I came across last week with one of the teams I help to build two years ago.
Company A was working on a confidential application for a client; the client was concerned that a breach of their code data would expose their intellectual property to competitors, or would become general knowledge.
The client asked that the following hierarchy be implemented to help mitigate their risk:
- Each Team has it own encrypted directory
- Only the specific team can access and read the code
- Admin can manage the files within all the directories, but cannot read the code
The Challenge
From those requirements, Company A faces the following challenges:
- How to implement access management and encryption at the same time
- How to avoid disruption of the DevOps team concept
- Delegate security manageability to the DevOps team without affecting the wider company policy
Solution
Access management can be controlled using the company Active Directory; but doing so will complicate the workflow of the DevOps team and will slow the delivery. At the same time, Active Directory and Group Policies do not offer encryption, so the IT department turned to Thales CipherTrust Manager to solve this challenge.
Implementation
To achieve all the security requirements, Company A decided to use CipherTrust Manager with the Transparent Encryption feature. Using Transparent Encryption Live Data Transformation (LDT), Company A can delegate the code data management to the DevOps team, but at the same time, encrypt the data and also keep Admin in control of managing and backing up the code files without compromising security.
So let’s learn how company A uses CipherTrust Manager to keep each team in control.
CipherTrust User and Domain
To delegate responsibilities, the Company A IT team was looking for a multi-tenanted system that can help the department to easily create and assign multiple teams to manage their own security requirements, while remaining isolated from each other. This requirement can be met with Thales CTM by creating a Domain to allow the DevOps team to manage their access control and security needs.
To create a Domain, you first create a user by browsing to “Access Management -> Users -> Add User“:

After you have added the user, apply the user to CTE Admins and Clients by going to Edit/view the user. Under Groups, Search CTE and add to Admin/Client:

The next step is to browse to “Admin Settings -> Domains” and click “Add Domain“:
- Name: DevOps
- Admins: devops (the user you just created)
- Choose the default CA
- Save

Now you are ready to logout and then login with the user you just created. After logging in again, change the domain to the new domain at the top right corner – Switch Domains:

Create a Key
To be able to encrypt the data, we must create a key. Creating a key is very simple with CipherTrust Manager, all you need is to browse to the keys at the left menu and press the “Add key“. The next step is to provide a Key name: for example we will create a key name: LDT_Key and then press”Add Key” to save it.
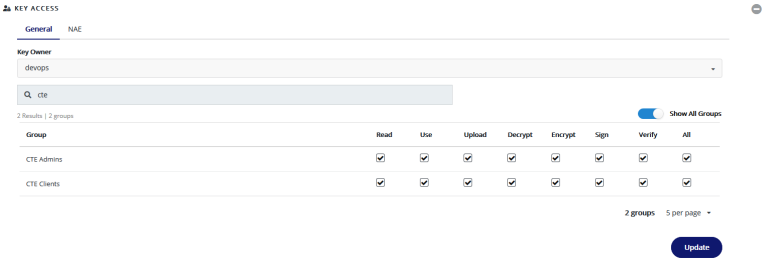
At the next window, expand the “Key Access” option. On the search bar, type “CTE” with show all groups, then tick the check boxes for all the Admins and Clients permissions. Press Update:
Next, browse to “Key Labels -> CTE“. Choose CBC from the drop down menu”. Press Update:

Install the Transparent Encryption Agent
To be able to install and use the Transparent Encryption feature, you must install an agent. The first step is to create a “Registration Token“; this will be used during the agent installation to add the agent to the CipherTrust Manager. To create the Token, browse to “Access Management -> Registration Tokens” and click on “Add Registration Token” and complete the following entries:
- Provide a Name Prefix: on my case DevOps_token
- Local CA: choose the default
- Create a token: Base64

Copy the token; then go to your Windows or Linux machine to run the agent installation. During the installation, you will be asked to provide:
- Componant to register: File System
- CipherTrust Manager IP/Hostname
- Enable LDT Feature (FS agent only)
- Token
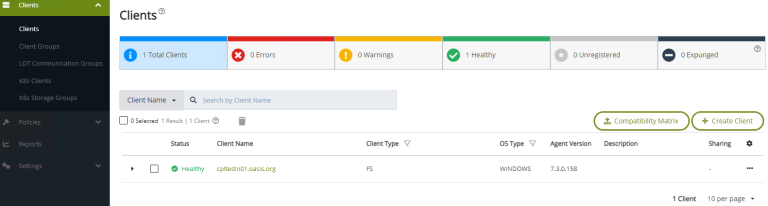
After the installation is completed and you have successfully rebooted, you will be able to see the registered client on your CipherTrust Manager under: Transparent Encryption -> Clients:
Creating Policies:
After deploying the agent and connecting it to the CTM, we can focus on creating our polices. As we have four different teams in our example, lets create four policies as shown below:
- DevOps_Admin_Team: Access and manage files and directories but can read files content
- DevOps_Dev_Team: access only Development directory
- DevOps_Ops_Policy: access only operation directory
- DevOps_QA_Team: access only QA diretory
Let’s create first policy, the DevOps_Admin_Team policy by browsing to “Transparent Encryption -> Policies -> Create policy“:
- Name: DevOps_Admin_Team
- Policy Type: Live Data Transformation
- Security Rules: + Create Security Rule
- User Set – Select – Create User Set:
- Name: Admin_Team
- Create User
- Agent – select Agent
- User Type: LDAP
- Member Choice: User or Group (on my case I choose group)
- gname: group name
- Note: repeat the above steps to create all the users for each group (i.e: Admin, Dev, Ops and QA team. on each time you need to create a policy you can easily choose the appropriate group or user)
- Action – Select
- Effect – Select
- select permit
- ApplyKey only of other group but not Admin group as the admin will not be able to unencrypt the data so a key not required
- Key Rules: Create key Rule
- Current Key Name: Select – “clear_key”
- Tranformation Key Name: Select – LTD_Key
- Add
- Next – Confirmation – Save
Note: repeat the above steps for all the groups
Create GuardPoint
Our last step is to apply these policies to our folders or client. In this example, I will be using a Windows client. So let’s get started:
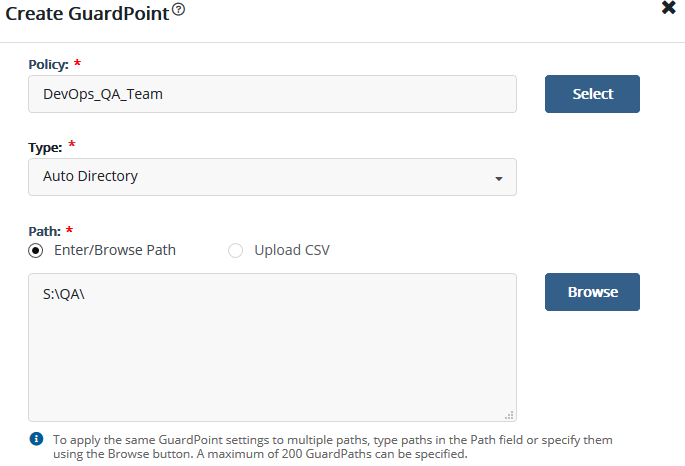
As we have different teams and policies, each with different access, we must create a different client GuardPoint. Browse to Transparent Encryption -> Clients. Choose the client – “Create GuardPoint“:
- Select Policy: choose DevOps_QA_Team
- Path: browse to the QA directory and select “select Path”
- Create
Note: repeat for each team and select the appropriate directory
After all the directories are assigned to a group – on each GuardPoint – press the policy name and add the right action for each team as shown below; for example:
- Development_Team can access, and apply key
- Operation_Team no access
- Admin_Team access but no key
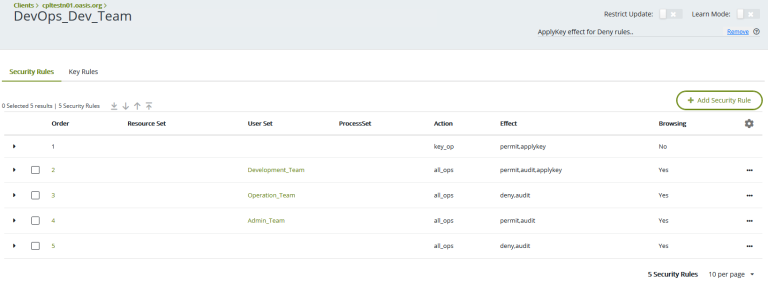
Note: repeat for all other GuardPoints
Summary
After Following the steps described above, you can check that your new configuration works by accessing your Windows machine with a different user; for example, QA, dev, ops or admin, then check to see if you can access or read the files. The above steps are a little involved, more than Active Directory Group Policies; but with CipherTrust you also get the encryption aspect with a full and controlled separation of responsibilities.
Company A was able to achieve their client’s security request; but at the same time, did not affect the team processes, autonomy, and control. At both levels, Company A IT and DevOps, it was a win – win situation.

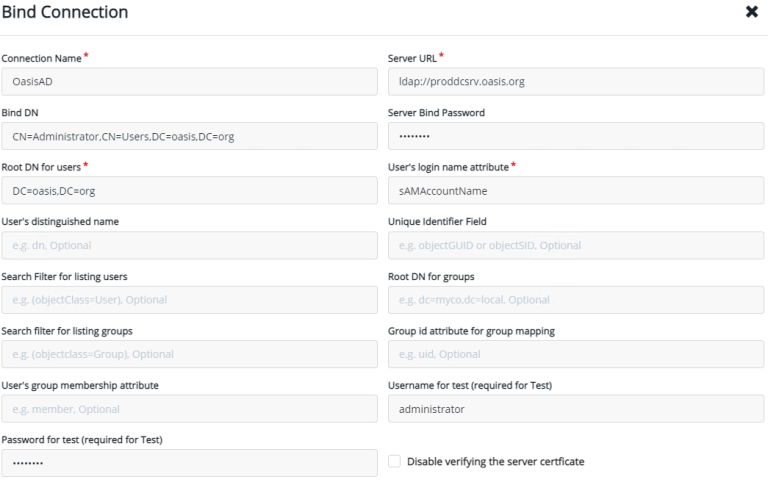
 Why should you integrate Thales CipherTrust with your Microsoft Active Directory? What are the benefits of integration, and how is it done? Does Thales CipherTrust Manager (CTM) replace your Active Directory Group policy?