Chaos Engine experiments with AWS
In this quick start guide we will be demonstrating experiments with the AWS cloud platform.
Chaos engine host configuration on AWS EC2 instance.
The Chaos Engine is a container based service. Please use the Linux OS to configure the Chaos Engine host. When you complete the setup of the Chaos Engine host and run it successfully. It will create three containers.
- Chaos engine
- HCL Vault
- HCL vault loader
Pre-requisites.
Please provision EC2 linux instance. In this scenario we will be provisioning an Ubuntu 18.04 EC2 instance on which you need to install Docker and Docker compose. Which will used as the Chaos Engine host machine.
- We will have to first create an AWS EC2 instance.
- If you have an AWS Account login to AWS management console. If not, set up a free tier instance in Amazon’s * EC2. From the link, click Try Amazon EC2 for Free and enter the requested details to create your account. Once you have signed up, log in to your account.
- Spin up/provision couple of Linux (Ubuntu) EC2 instance for the Chaos Engine.
- Follow the EC2 instance creation instructions here.
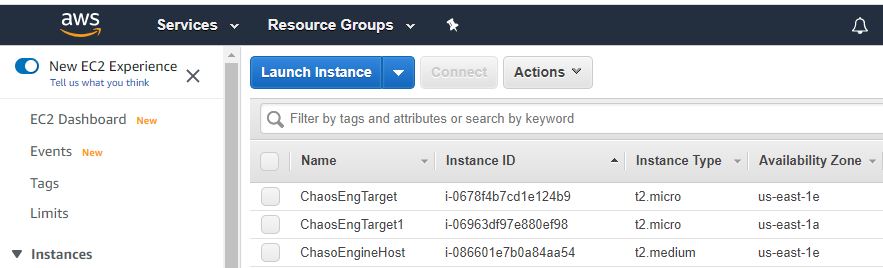
- In this scenario we will have total 3 AWS EC2 instance one is for host purpose and remaining 2 are target instance.
- Open the Amazon EC2 dashboard. Find your new running instance in the list and click to highlight it. Click Connect for information on how to connect to this instance using SSH.
Following is the snippet from AWS console on EC2 instance.
$ ssh -i "YourKeyName.pem" ubuntu@publicDNSname
After successful login please start installation of the Chaos Engine host.
Step 1: Docker Installation
Follow the Docker installation instructions here
Verify Docker Installation
To verify Docker installation run docker ps.
Expected output is:
user@host:~$ docker ps
CONTAINER ID        IMAGE               COMMAND             CREATED             STATUS              PORTS               NAMES
If the output looks similar to following example open new terminal session or simply logout and login again.
user@host:~$ docker ps
Got permission denied while trying to connect to the Docker daemon socket at unix:///var/run/docker.sock: Get http://%2Fvar%2Frun%2Fdocker.sock/v1.40/containers/json: dial unix /var/run/docker.sock: connect: permission denied
Step 2: Install Docker Compose
For detailed instructions on how to install the docker compose see official Docker documentation.
Verify Docker Compose Installation
user@host:~$ docker-compose -v
docker-compose version 1.25.0, build 0a186604
If the command docker-compose fails after installation, check your path.
You can also create a symbolic link to /usr/bin or any other directory in your path.
Step 3: Download The Latest Chaos Engine Sources
user@host:~$ git clone https://github.com/thalesgroup/chaos-engine
Cloning into 'chaos-engine'...
...
Checking connectivity... done.
Step 4: Pull Chaos Engine Image
Pull the latest Chaos Engine image from DockerHub.
user@host:~$ cd chaos-engine/
user@host:~/chaos-engine$ docker pull thalesgroup/chaos-engine:latest
Step 5: Configure
Basic Framework Setup
user@host:~/chaos-engine$ echo "holidays=NONSTOP
VAULT_TOKEN=00000000-0000-0000-0000-000000000000
VAULT_SCHEME=http
VAULT_HOST=vault
VAULT_PORT=8200
VAULT_10=true
SPRING_PROFILES_ACTIVE=DEVELOPMENT

automatedMode=false
CHAOS_SECURITY_ENABLED=false" > .env
Configure Experiment Modules
Let's say you want to execute experiments targeting a Kubernetes cluster.
First check experiment modules documentation to see what config options are available then add all configuration properties into vault-secrets.json file located in ~/developer-tools/vault-loader.
Example content of vault-secrets.json
{
  "kubernetes": "",
  "kubernetes.url": "https://127.127.127.127",
  "kubernetes.token": "eyJhbGciOiJIUzI1NiIsInR5cCI6IkpXVCJ9.eyJzdWIiOiIxMjM0NTY3ODkwIiwibmFtZSI6IkpvaG4gRG9lIiwiaWF0IjoxNTE2MjM5MDIyfQ.SflKxwRJSMeKKF2QT4fwpMeJf36POk6yJV_adQssw5c",
  "kubernetes.averageMillisPerExperiment": "30000"
}
vault-secrets.json
{
"aws.ec2":"true",
"aws.accessKeyId":"<access_key_id>",
"aws.secretAccessKey":"<Secrate_access_String>",
"aws.region":"us-east-1",
"aws.ec2.filter.tag.ChaosVictim":"true",
"aws.ec2.averageMillisPerExperiment":"30000",
"aws.ec2.sshprivatekeys.<your_Key_Name>":"<private_key>”
}
Importance Note:
- Please make sure you grant access to your IAM user to have FullEC2access
- The “ChaosVictim” = “true” tag must be existing in the target EC2 instances
- Please allow all the required ports 80, 8080, 8200 and 22 on the Chaos Engine host machine.
Configure DataDog Integration
Enable DataDog
First of all, you have to sign up with Datadog to enable the integration with chaos-engine.
Kindly go to the below URL to create your account in Datadog. Datadog sign up You will get 14 days free trial account. Please sign up for free account for now to test it.
Once you have account setup you, login to datadog portal -> API’s -> hover the mouse on the key, and your API Key will be displayed.

If you are going to ship data to DataDog run following command where $YOUR_API_KEY will be replaced by your real DataDog API key.
user@host:~/chaos-engine$ echo "DD_API_KEY=$YOUR_API_KEY" > .datadog_api_key
Disable DataDog
If you don't need DataDog integration keep .datadog_api_key empty
user@host:~/chaos-engine$ touch .datadog_api_key
Step 6: Start chaos engine host
Start the Engine by running docker-compose up
user@host:~/chaos-engine$ docker-compose up
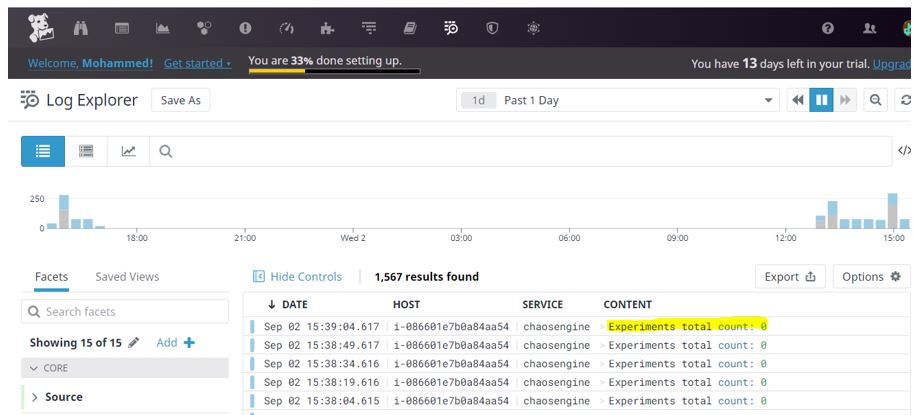
Experiments total count: 0 your Chaos Engine instance is up and ready
chaosengine_1 | {"@timestamp":"2019-11-28T18:07:36.491Z","@version":"1","message":"Experiments total count: 0","logger_name":"com.thales.chaos.experiment.ExperimentManager","thread_name":"chaos-10","level":"INFO","level_value":20000,"count":0,"env":"DEVELOPMENT","chaos-host":"b4bd5f0829d6@172.18.0.4"}
Chaos Engine Experiments
Each Experiment Module is responsible for interacting with the API endpoint of its appropriate Cloud Platform or Orchestration tool. The Experiment Modules discover nodes that can be experimented upon, ensuring experiments keep a minimum blast radius, and performing the API calls necessary to create an experiment. Kindly refer the below URL for the same.
There are two modes of experiments in the Chaos Engine.
1 Automated mode
In automated mode experiment selection as well as platform is done randomly.
2 User defined mode
In user defined experiment you can run shell and API experiments. You can choose platform as well as the experiment type. In order to run the user defined experiments you need to provide an input to experiments.
Note: Shell experiments require Cattle resources, that means your target resource must be backed by some kind of auto scaling mechanism. E.g. in EC2 resource case the instance must be backed by AutoScalingGroup. In AWS EKS resource case the pod must have a deployment with more than one replicas etc.
User define experiments The parameter for a User Defined Experiment is a single object with two variables. The platformType variable should be the name of the Platform you wish to experiment on. The experimentCriteria variable requires an object of containerIdentifier, experimentMethods[], and optional specificContainerTargets[], to identify the aggregate container group, the type of experiments to run, and any specific targets which may not be identical (i.e., a MongoDB Primary node).
The Experiment Structure object can be sent as the data stream of a POST request to /experiment/build to create the experiments. The server expects a Content-Type of application/json. See the REST API for more information. Following is the sample JSON for user defined experiments. You may find more information about this at
Example of user define API experiments
{
    "platformType": "KubernetesPlatform",
    "experimentCriteria": [
        {
            "containerIdentifier": "nginx-deployment-574b87c764",
            "experimentMethods": [
                "deletePod"
            ],
            "specificContainerTargets": [ ]
        }
    ]
}
Example of user defined Shell experiments
{
    "platformType": "KubernetesPlatform",
    "experimentCriteria": [
        {
            "containerIdentifier": "nginx-deployment-574b87c764",
            "experimentMethods": [
                "forkBomb.sh"
            ],
            "specificContainerTargets": [ ]
        }
    ]
}
Experiment Modules
Following are the list of experiments are available in the Chaos Engine. Kindly refer the below url for list of available experiments.
| AWS EC2 instance | Kubernetes | AWS RDS | Pivotal Cloud foundry | Shell Experiments |
|---|---|---|---|---|
| Stop | Delete at POD layer | Take a snapshot | Restart | BurnIO |
| Restart | Shell experiment at Container layer | Restart | Rescale | CPUBurn |
| Deletion of Security Group | Deletion of Security Group | Restage | DNS Block | |
| Instance termination only in Auto Scaling Group | Random restart of cluster nodes | Shell Experiments | Fill Disk | |
| Shell experiments | Failover | Forkbomb | ||
| Ram consumer | ||||
| Null route | ||||
| Generator starvation | ||||
| Process killer |
Run Experiments
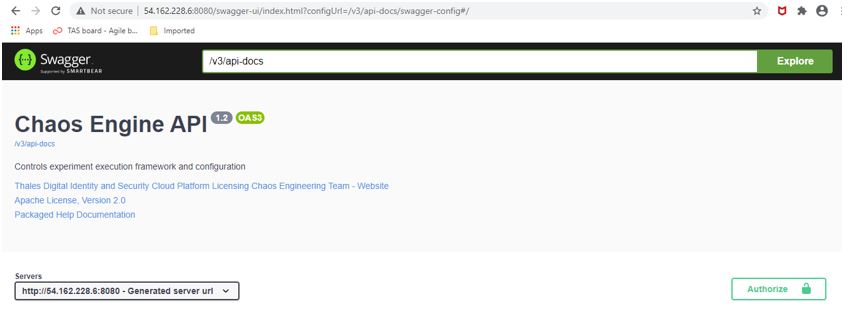
In order to run the experiments, make sure that docker-compose is up and running on the Chaos Engine host. After that you can login to Swagger UI to run the experiments.
Following is the URL for swagger UI you need to replace IP address of you host.
http://yourpublicIP:8080/swagger-ui.html#/
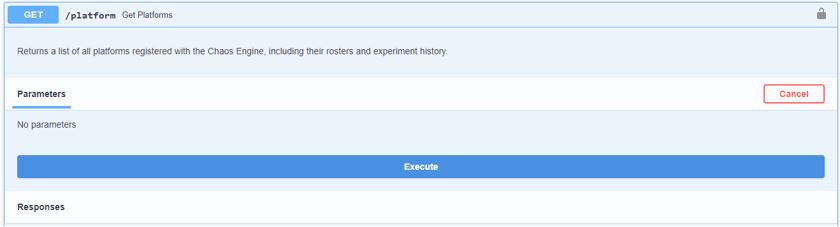
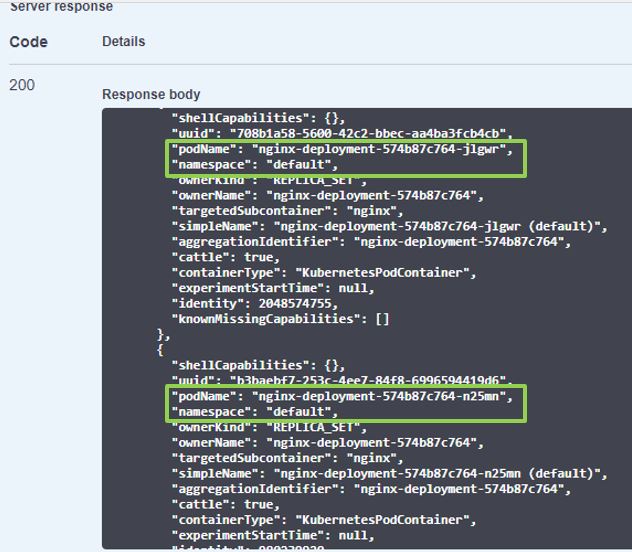
To check the available targets/platform for the experiments you can execute following from swagger UI. Look for the platform section and click on Get /Platform.
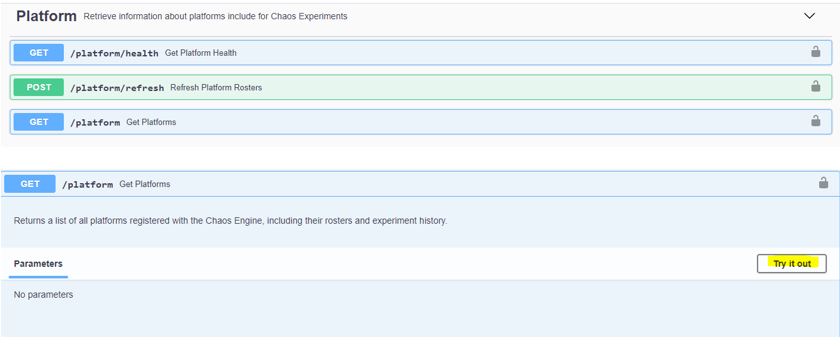
Click on execute.
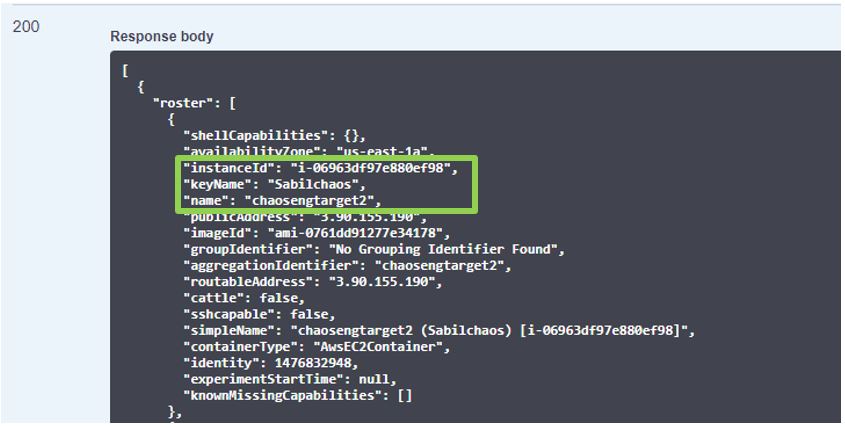
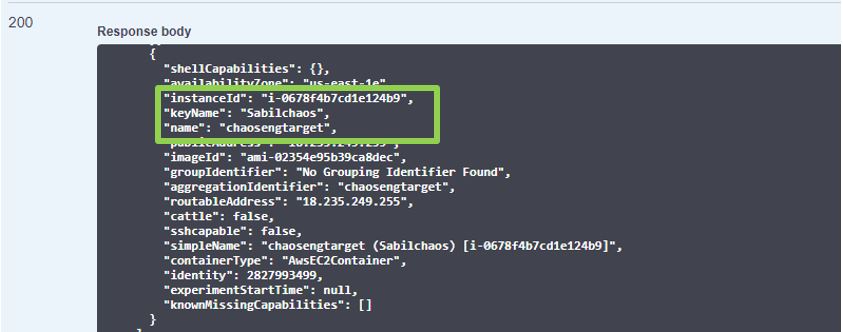
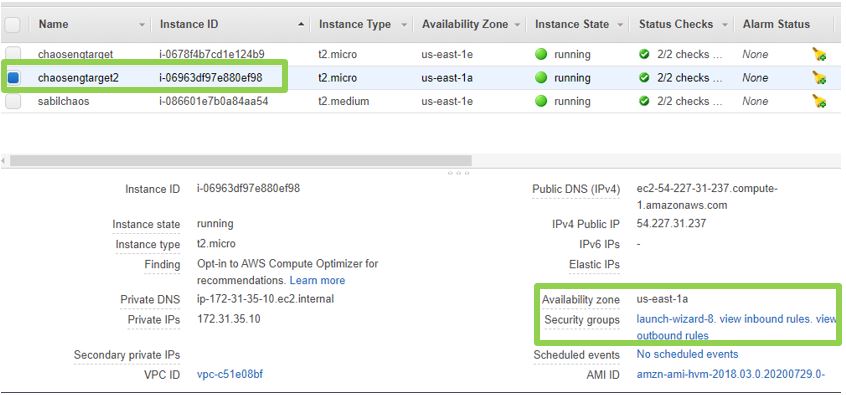
Refer the response body section. In the below screen shot you can see instance details such as name, id and tags, which we have created as a targets to perform the experiments. There are total 2 instance or targets are available for experiments.
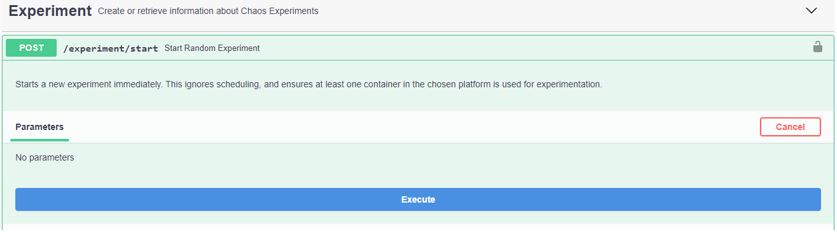
Next go the Experiments section and run the experiments. POST /experiments/start.
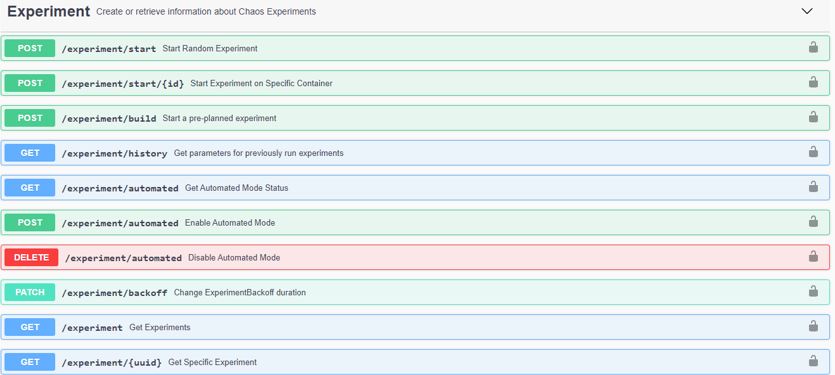
Now we are going to start the experiment by clicking on /experiment/start (Start Random Experiment) Click on /experiment/start -> try it out -> Execute.
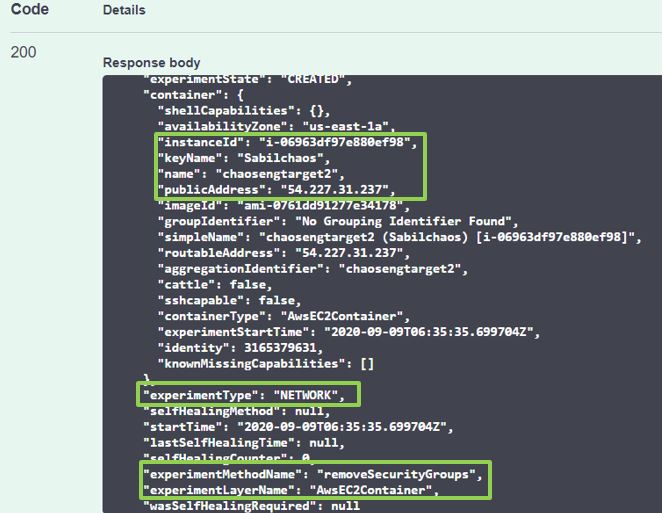
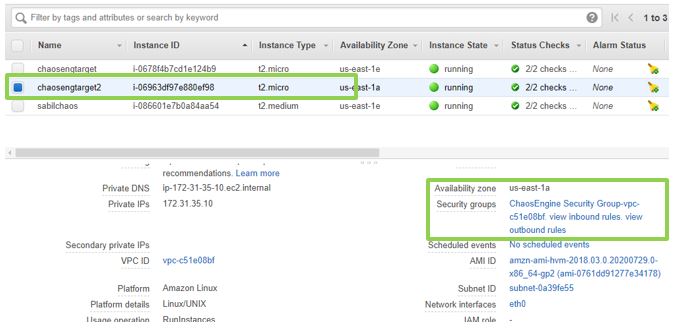
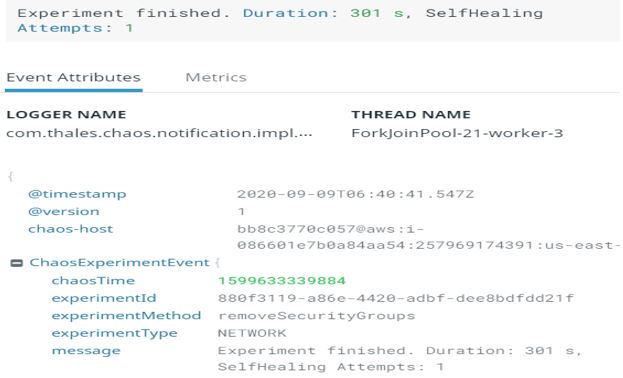
The Chaos Engine has chosen “removeSecurityGroups” experiment randomly. It will remove the security group for an EC2 instance. Kindly refer the below screen shot from the AWS console.
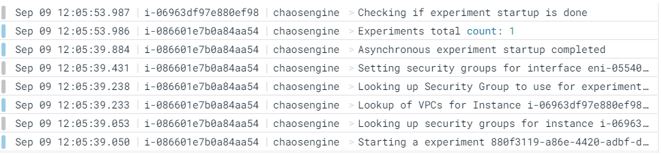
Logs from the Chaos Engine host.
chaosengine_1 | {"@timestamp":"2020-09-09T06:36:24.124Z","@version":"1","message":"Evaluated experiment: Experiment of removeSecurityGroups against chaosengtarget2 (Sabilchaos) [i-06963df97e880ef98]","logger_name":"com.thales.chaos.experiment.ExperimentManager","thread_name":"ForkJoinPool-4-worker-3","level":"INFO","level_value":20000,"experimentMethod":"removeSecurityGroups","host":"i-06963df97e880ef98","experimentid":"880f3119-a86e-4420-adbf-dee8bdfdd21f","platform":"AwsEC2Platform","experiment":{"id":"880f3119-a86e-4420-adbf-dee8bdfdd21f","experimentState":"STARTED","container":{"shellCapabilities":{},"availabilityZone":"us-east-1a","instanceId":"i-06963df97e880ef98","keyName":"Sabilchaos","name":"chaosengtarget2","publicAddress":"54.227.31.237","imageId":"ami-0761dd91277e34178","groupIdentifier":"No Grouping Identifier Found","simpleName":"chaosengtarget2 (Sabilchaos) [i-06963df97e880ef98]","routableAddress":"54.227.31.237","aggregationIdentifier":"chaosengtarget2","cattle":false,"sshcapable":false,"containerType":"AwsEC2Container","experimentStartTime":1599633339.884297000,"identity":3165379631,"knownMissingCapabilities":[]},"experimentType":"NETWORK","selfHealingMethod":{},"startTime":1599633339.884297000,"lastSelfHealingTime":null,"selfHealingCounter":0,"experimentMethodName":"removeSecurityGroups","experimentLayerName":"AwsEC2Container","wasSelfHealingRequired":null},"env":"PROD","chaos-host":"bb8c3770c057@aws:i-086601e7b0a84aa54:257969174391:us-east-1"}
After completion of experiment you can see Chaos Engine has reverted Security Group as part of the experiment. Below is the snippet for the same.
Note: - you can configure/enable monitoring tool to get the real time analysis of a targets.
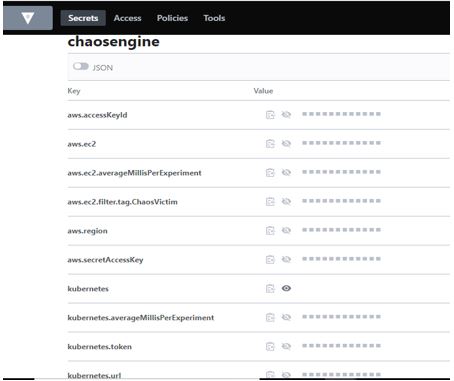
Vault Secret modification.
In the Chaos Engine experiments we are using a HCL Valut to store the crednatils. As you see that we need to update the "vault-secerets.json" file to maintain the AWS Access and Secret key to access the AWS resources. If you would to to add new experiments or update the extisting information of a valut you can make those changs.
There are two ways to do the modifications in vault secerets.
1 Updating the vault-secrets.json file
Once you update the vault-secret.json you need to run the following command to take the changes effect.
$ docker-compose build vault vault-loader
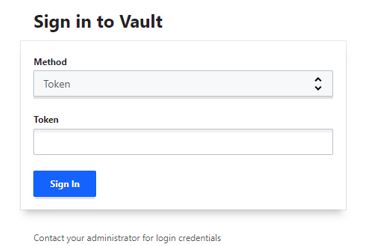
To login to the vault GUI please use the following URL and just update the IP address of the Chaos Engine Host.
http://yourpublicIP:8200/ui
Once you hit the above URL you will be ask for credentials. You can choose method is “Token” and token value is “00000000-0000-0000-0000-00000000000”
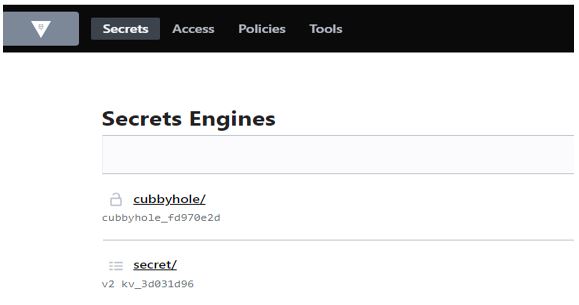
Go to secret update the changes and save it.
Make the changes/modification to the above parameters and then run the Refresh from Swagger UI. To take the changes affect.

Experiments on AWS Elastic Kubernetes Services EKS.
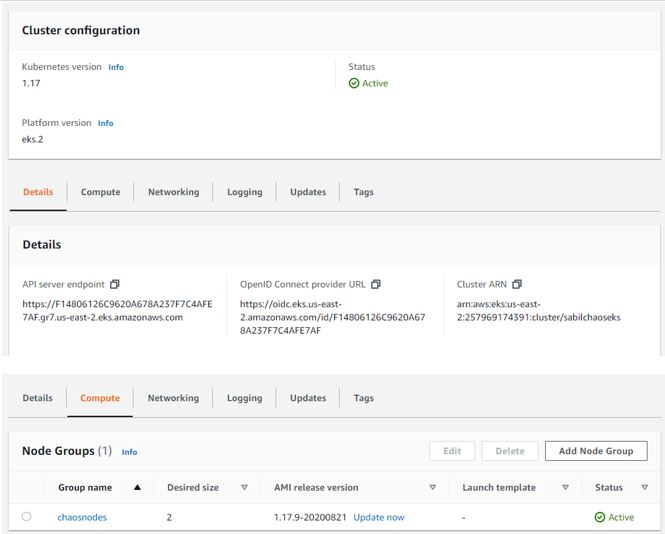
We will performing an experiment on AWS EKS cluster. As part of the pre-requisite please create an AWS EKS. Kindly refer Kubernetes configuration
In this scenario we have created a EKS with 2 nodes and 1 Nginx deployment. Following the is the screenshot for EKS from AWS.
Once you have EKS cluster ready. Proceed with Nginx deployement.
kubectl apply -f https://k8s.io/examples/controllers/nginx-deployment.yaml

$ kubectl get pods
NAME                                READY   STATUS    RESTARTS   AGE
nginx-deployment-574b87c764-jlgwr   1/1     Running   0          19h
nginx-deployment-574b87c764-kbmqh   1/1     Running   0          3h18m
nginx-deployment-574b87c764-rlv6f   1/1     Running   0          19h

$ kubectl get deployment
NAME               READY   UP-TO-DATE   AVAILABLE   AGE
nginx-deployment   3/3     3            3           19h

$ kubectl get rs
NAME                          DESIRED   CURRENT   READY   AGE
nginx-deployment-574b87c764   3         3         3       19h
Now, get the secret information by executing the following command to connect using Chaos Engine. You need to have token, namespace values to update the secrets.
$ kubectl describe secret
Name:         chaos-engine-serviceaccount-token-r6ptr
Namespace:    default
Labels:       <none>
Annotations:  kubernetes.io/service-account.name: chaos-engine-serviceaccount
              kubernetes.io/service-account.uid: 7ec6da4a-a006-49e3-ac5e-16735be3853c

Type:  kubernetes.io/service-account-token

Data
====
ca.crt:     1025 bytes
namespace:  7 bytes
token:      eyJhbGciOiJSUzI1NiIsImtpZCI6IllIX2cyMGtaSjVsVTUzZmFHdTVRS3U2TTZCdU9Wc0dUSk9HUnByN2t1VXMifQ.eyJpc3MiOiJrdWJlcm5ldGVzL3NlcnZpY2VhY2NvdW50Iiwia3ViZXJuZXRlcy5pby9zZXJ2aWNlYWNjb3VudC9uYW1lc3BhY2UiOiJkZWZhdWx0Iiwia3ViZXJuZXRlcy5pby9zZXJ2aWNlYWNjb3VudC9zZWNyZXQubmFtZSI6ImNoYW9zLWVuZ2luZS1zZXJ2aWNlYWNjb3VudC10b2tlbi1yNnB0ciIsImt1YmVybmV0ZXMuaW8vc2VydmljZWFjY291bnQvc2VydmljZS1hY2NvdW50Lm5hbWUiOiJjaGFvcy1lbmdpbmUtc2VydmljZWFjY291bnQiLCJrdWJlcm5ldGVzLmlvL3NlcnZpY2VhY2NvdW50L3NlcnZpY2UtYWNjb3VudC51aWQiOiI3ZWM2ZGE0YS1hMDA2LTQ5ZTMtYWM1ZS0xNjczNWJlMzg1M2MiLCJzdWIiOiJzeXN0ZW06c2VydmljZWFjY291bnQ6ZGVmYXVsdDpjaGFvcy1lbmdpbmUtc2VydmljZWFjY291bnQifQ.Spj9BlS3Fq1s7SOIE4o_ySRYD6G0yMY_hUzSkLenymUPNaUDNbI3B6w_6VIaYkOUu34_nx5yOOD1RJWktXHqMmmEb_qjl5HnjsP41ugQU_LSQfIraSLbozE4ZP92Yx9Leq2bVYQN6JSv71GBOQOHRE91OSFfW2ENjna_MHHkgfw5usDZw3vF6d8lBjJA0DVbhgeZlAL9PPpaGLj-QjB6p2gg-BXXCC5dUiJsWZ77w8SwLyBx4NdKaLldPUisck-c8PVmGqWIawpHFM_C6fAxVeJv0TiyVou8Y-_7DGJzxhEDvSZ5Wu01qt0gp0mFcADYHorhkyi80CYVOTp22HuQHQ
Once you have the above information. Now you need to update vault-secrets.json or update the same information in vault.
Please make sure that updated information should take effect. Kindly refer Vault Secret modification.
{
"kubernetes": "",
  "kubernetes.url": "https://F14806126C9620A678A237F7C4AFE7AF.gr7.us-east-2.eks.amazonaws.com", -> you can get this from AWS EKS console API server endpoint.
  "kubernetes.token":  -> can be taken from kubectl describe secrets command. "eyJhbGciOiJSUzI1NiIsImtpZCI6IllIX2cyMGtaSjVsVTUzZmFHdTVRS3U2TTZCdU9Wc0dUSk9HUnByN2t1VXMifQ.eyJpc3MiOiJrdWJlcm5ldGVzL3NlcnZpY2VhY2NvdW50Iiwia3ViZXJuZXRlcy5pby9zZXJ2aWNlYWNjb3VudC9uYW1lc3BhY2UiOiJkZWZhdWx0Iiwia3ViZXJuZXRlcy5pby9zZXJ2aWNlYWNjb3VudC9zZWNyZXQubmFtZSI6ImNoYW9zLWVuZ2luZS1zZXJ2aWNlYWNjb3VudC10b2tlbi1yNnB0ciIsImt1YmVybmV0ZXMuaW8vc2VydmljZWFjY291bnQvc2VydmljZS1hY2NvdW50Lm5hbWUiOiJjaGFvcy1lbmdpbmUtc2VydmljZWFjY291bnQiLCJrdWJlcm5ldGVzLmlvL3NlcnZpY2VhY2NvdW50L3NlcnZpY2UtYWNjb3VudC51aWQiOiI3ZWM2ZGE0YS1hMDA2LTQ5ZTMtYWM1ZS0xNjczNWJlMzg1M2MiLCJzdWIiOiJzeXN0ZW06c2VydmljZWFjY291bnQ6ZGVmYXVsdDpjaGFvcy1lbmdpbmUtc2VydmljZWFjY291bnQifQ.Spj9BlS3Fq1s7SOIE4o_ySRYD6G0yMY_hUzSkLenymUPNaUDNbI3B6w_6VIaYkOUu34_nx5yOOD1RJWktXHqMmmEb_qjl5HnjsP41ugQU_LSQfIraSLbozE4ZP92Yx9Leq2bVYQN6JSv71GBOQOHRE91OSFfW2ENjna_MHHkgfw5usDZw3vF6d8lBjJA0DVbhgeZlAL9PPpaGLj-QjB6p2gg-BXXCC5dUiJsWZ77w8SwLyBx4NdKaLldPUisck-c8PVmGqWIawpHFM_C6fAxVeJv0TiyVou8Y-_7DGJzxhEDvSZ5Wu01qt0gp0mFcADYHorhkyi80CYVOTp22HuQHQ",
  "kubernetes.averageMillisPerExperiment": "30000"
}
Then create a file called chaos-engine-service-account.yaml for role binding and make the modification in your file. Replace {{namespace}} with actual namespace and then execute it.
You may refer following for EKS cluster configuration for Chaos Engine. EKS configuration for the Chaos Engine
apiVersion: rbac.authorization.k8s.io/v1
kind: Role
metadata:
  name: chaos-engine-role
  namespace: {{namespace}}
rules:
- apiGroups:
  - apps
  resources:
  - daemonsets
  - daemonsets/status
  - deployments
  - deployments/status
  - replicasets
  - replicasets/status
  - statefulsets
  - statefulsets/status
  verbs:
  - get
  - list
- apiGroups:
  - ""
  resources:
  - pods
  verbs:
  - delete


- apiGroups:
  - ""
  resources:
  - pods
  - pods/status
  - replicationcontrollers/status
  verbs:
  - get
  - list

- apiGroups:
  - ""
  resources:
  - pods/exec
  verbs:
  - create
  - get

---

apiVersion: v1
kind: ServiceAccount
metadata:
  name: chaos-engine-serviceaccount
  namespace: {{namespace}}

---

apiVersion: rbac.authorization.k8s.io/v1
kind: RoleBinding
metadata:
  name: chaos-engine-rolebinding
  namespace: {{namespace}}
roleRef:
  apiGroup: rbac.authorization.k8s.io
  kind: Role
  name: chaos-engine-role
subjects:
- kind: ServiceAccount
  name: chaos-engine-serviceaccount
  namespace: {{namespace}}
Execute the YMAL file.
kubectl apply -f chaos-engine-service-account.yaml
Once you update the secrets go ahead and run get platform from Swagger UI.
Now you can initiate the experiments using Automated or user defined method. After running the experiments, you should have a monitoring configured or enable for your K8 nodes so that you will be able to get the real data.
We are going to run the experiments on AWS EKS cluster. Once we executed the run experiment API from Swagger UI you will see the following response.
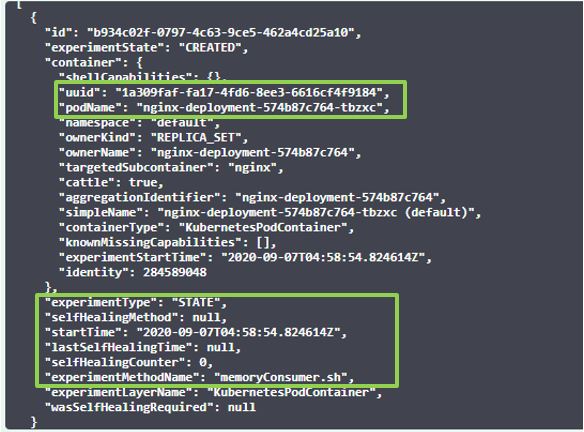
You can see in the above experiment response code output that the Chaos Engine is going to run the experiments on AWS EKS. Please see the above highlight section of a response code, where in you can see experiment platform as a EKS pods and experiment name is memoryConsumer.sh .
Logs captured from the Datadog for this experiment. Here are the logs from the Chaos Engine host which says that experiments started.
chaosengine_1 | {"@timestamp":"2020-09-09T06:57:12.614Z","@version":"1","message":"Evaluated experiment: Experiment of memoryConsumer.sh against nginx-deployment-574b87c764-7wp8h (default)","logger_name":"com.thales.chaos.experiment.ExperimentManager","thread_name":"ForkJoinPool-42-worker-3","level":"INFO","level_value":20000,"experimentMethod":"memoryConsumer.sh","host":"nginx-deployment-574b87c764-7wp8h","experimentid":"df244f9a-85f6-4bad-80b5-5787c64a43ec","platform":"KubernetesPlatform","experiment":{"id":"df244f9a-85f6-4bad-80b5-5787c64a43ec","experimentState":"STARTED","container":{"shellCapabilities":{"sleep":true,"dd":true,"awk":true,"/bin/sh":true,"grep":true,"cat":true},"uuid":"a6eb617c-39e9-4fc3-a333-e400f335f95c","podName":"nginx-deployment-574b87c764-7wp8h","namespace":"default","ownerKind":"REPLICA_SET","ownerName":"nginx-deployment-574b87c764","targetedSubcontainer":"nginx","simpleName":"nginx-deployment-574b87c764-7wp8h (default)","aggregationIdentifier":"nginx-deployment-574b87c764","cattle":true,"containerType":"KubernetesPodContainer","experimentStartTime":1599634333.020662000,"identity":3504227930,"knownMissingCapabilities":[]},"experimentType":"STATE","selfHealingMethod":{},"startTime":1599634333.020662000,"lastSelfHealingTime":null,"selfHealingCounter":0,"experimentMethodName":"memoryConsumer.sh","experimentLayerName":"KubernetesPodContainer","wasSelfHealingRequired":null},"env":"PROD","chaos-host":"bb8c3770c057@aws:i-086601e7b0a84aa54:257969174391:us-east-1"}
This experiment will spike up the memory on the container. You can check the memory utilization in monitoring tool or in the nodes using the following.
kubectl top nodes
Or else, you can SSH to the EKS nods and run TOP command see the memory useage.
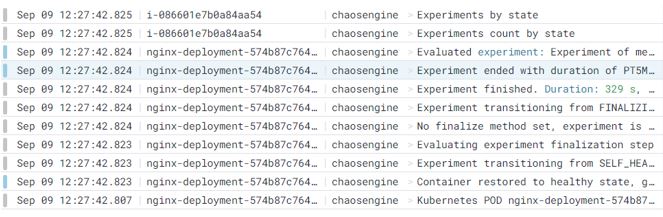
Here I can see the experiment has been finishd in the Datadog logs.
Summary
Congratulations, you just ran your first Chaos Engine experiment! Feel free to run the experiment many times, varying parameters and seeing how that impacts your instance. Next steps could be to add a full monitoring solution to the instance for better data. (we recommend doing that with a non-production, non-vital server at this stage, should you go this route).
When you are done testing using the Amazon instance created for this article, don’t forget to terminate the Amazon instance.
Best wishes and have fun unleashing the Chaos Engine! :)